I'm writing this blog entry because Vita-Mix is now officially on my shit list. The story will follow below, but the bottom line is that I want You The Owner to be able to fix your property yourself, and not have to pay Vita-Mix outrageous amounts of money to do a simple job like changing out a simple electrical component that really anyone could do. Bear in mind that what I show below voids the warranty. If you decide to open up your machine, it's your decision and your warranty. But I know this fix works for the indicated problem, and if you have this particular problem it will be worth it to you just for the feeling of empowerment it will give you to fix your own machine. The offending unit:

My wife bought this particular Vita-Mix 5000 at the Iowa State Fair about 10 years ago. She loves the thing, and it served us well until recently when the motor began running very erratically on the variable speed setting.
More disclosure: Fed Up Airline Pilot I may be, but my college degree is as a Laser Technician, and along with optics classes came a huge amount of electro-mechanical classes. In fact, just a couple of extra classes and I could have earned the Electronics Technician degree. The point is that I'm over-qualified to fix a blender, but it's really not rocket science, and I believe that anyone can do the same thing with proper guidance. You can do it! http://www.youtube.com/watch?v=VZ2HcRl4wSk
Tool list, all available at Radio Shack:
A medium Phillips screwdriver (the star one not the flat one)
A very small flat head screwdriver (the flat one not the star one)
A 13mm deep-well socket with associated ratchet wrench
Soldering iron and solder
Heat-shrink tubing
That's it, can you stand it!?
Parts list:
Go to www.alliedelec.com and order part number 70153162. It's about $8 plus shipping.
http://www.alliedelec.com/search/productdetail.aspx?SKU=70153162
Just in case the link breaks, what you're looking for is a potentiometer, linear 0-5K Ohm, 312 degree rotation, with .25" diameter input shaft. The stock Vita-Mix part is only .75 Watt, but this sucker's rated for 2 Watts. "More power!" - Tim the Tool Man Taylor
For full disclosure, this is just one part out of a thousand different components which will do the same job, but it's the one I chose and it works just dandy. Don't mess with success!
Troubleshooting the problem: Our Vita-Mix 5000 was acting like the variable resistor (potentiometer) was only making intermittent contact with the speed control board. The motor ran fine on the "High" RPM High/Variable switch setting, but randomly turned on and off when in variable speed mode and the knob was turned. After the fact and with the benefit of 20/20 hindsight, I can now say with certainty that the following was indeed the fix for this particular problem. The faulty part that this whole posting is about (the potentiometer) is shown below:

To test my diagnosis, I began disassembling.
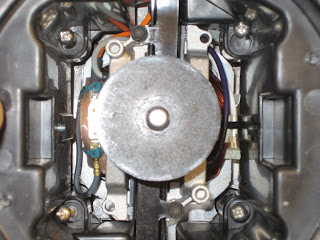
Here's your starting point:

First, I loosened the power cable restraining screws in order to expose the motor fan shroud screws:

Next, remove the four (4) screws which hold down the top half of the motor fan shroud and remove the top half of the fan shroud, noting for later that there's a little notch at the top to help alignment during reassembly:

Then remove the bottom half of the fan shroud assembly. It should come right off. Again, note the notch on the top for easier reassembly later:

Next, remove the four screws at the four corners in the picture below:

Just to be sure, these are the screws you're removing - I show them below in the "loosened" position:
Remove the screws, and you're ready to separate the two halves of the base:

Separate the two halves of the base. It may be sticky, but just apply gentle pressure around the edges until it comes apart. Note also the little rubber vibration dampener. These are shown separate in the next picture. During reassembly it's important to get them back on the edges.


Next, using your small flat head screwdriver, loosen the small screw holding on the knob:

Remove the knob (this is the new Honeywell component already installed; as I said earlier I decided to do this blog post only after the fact, just imagine it's black instead of silver, ok?):

Using your 13mm deep-well socket, remove the nut holding in the potentiometer:


Now back inside the housing. This is the new component, already installed. This is where the soldering comes into play. Using your soldering iron, remove the two leads from the old potentiometer. Cut three pieces of heat-shrink tubing to length and slip the pieces over the wires before re-soldering the leads to the new component. !!!VERY IMPORTANT!!! Use the same left two terminals on the potentiometer as were used on the old part (the left two as you look down on the potentiometer) and leave the third (right) leg unused. Use a match or cigarette lighter to shrink the tubing onto the leads, using a shorter piece to protect the third unused leg:

Note how beefy and strong this Honeywell sweetheart is, compared to the weak sauce plastic original POS! Rated for 25,000 cycles, baby!
Simply reverse these steps to reassemble the unit. Only one "gotcha!" left to cover yet.
After reassembling the base, now we need to make sure the dial indicator knob is properly aligned with the appropriate speed setting. To do this simply twist the potentiometer input shaft as far counter-clockwise as it will go (until it stops). This will be the "1" speed position. Then without bumping or turning the input shaft, slide the indicator knob onto the shaft and align the white hash mark with the "1" position. Tighten the screw down and you're all set!
Now why after this is all said and done would I take the time to pass along all this valuable information to you, my internet friends? Well here's how my interaction with Vita-Mix went down...
After troubleshooting, I looked online for the Vita-Mix parts and service center. I saw that they charge $150 to fix pretty much any problem per event. Since the machine we own is 10 years old, it was not worth it to me to spend $150 on a repair - that's almost halfway to a new machine!
After disassembly and removal of the old potentiometer, I contacted Vita-Mix via email (their preferred method of contact) requesting a price quote on a new potentiometer, making sure to include all pertinent information such as serial number and even the part number printed on the side of the potentiometer. I received no reply for several days. I then called them up on their -800 number to order a new potentiometer. I was given a price quote of $147! My jaw dropped and I managed to recover my wits about me enough to ask "For crying out loud, why?! $147 for a simple potentiometer? Are you nuts?!" The gal on the other end of the line was nice enough to admit to me that the reason it's so expensive is to discourage folks from trying a DIY fix, and to encourage you to send it in to the repair center for $150. Bullshit, I say! Almost two weeks later, I received a reply email from their customer service department telling me I needed to call the -800 number. They couldn't possibly send in written form their insane price gouging, and they're right about that... I would have posted it here!
So, as revenge for their price gouging, I did several hours' worth of work here in order to provide you my internet brothers and sisters good information so that you can make an informed spending decision. Send your Vita-Mix in to be repaired for $150, or do it yourself for about $10.

My wife bought this particular Vita-Mix 5000 at the Iowa State Fair about 10 years ago. She loves the thing, and it served us well until recently when the motor began running very erratically on the variable speed setting.
More disclosure: Fed Up Airline Pilot I may be, but my college degree is as a Laser Technician, and along with optics classes came a huge amount of electro-mechanical classes. In fact, just a couple of extra classes and I could have earned the Electronics Technician degree. The point is that I'm over-qualified to fix a blender, but it's really not rocket science, and I believe that anyone can do the same thing with proper guidance. You can do it! http://www.youtube.com/watch?v=VZ2HcRl4wSk
Tool list, all available at Radio Shack:
A medium Phillips screwdriver (the star one not the flat one)
A very small flat head screwdriver (the flat one not the star one)
A 13mm deep-well socket with associated ratchet wrench
Soldering iron and solder
Heat-shrink tubing
That's it, can you stand it!?
Parts list:
Go to www.alliedelec.com and order part number 70153162. It's about $8 plus shipping.
http://www.alliedelec.com/search/productdetail.aspx?SKU=70153162
Just in case the link breaks, what you're looking for is a potentiometer, linear 0-5K Ohm, 312 degree rotation, with .25" diameter input shaft. The stock Vita-Mix part is only .75 Watt, but this sucker's rated for 2 Watts. "More power!" - Tim the Tool Man Taylor
For full disclosure, this is just one part out of a thousand different components which will do the same job, but it's the one I chose and it works just dandy. Don't mess with success!
Troubleshooting the problem: Our Vita-Mix 5000 was acting like the variable resistor (potentiometer) was only making intermittent contact with the speed control board. The motor ran fine on the "High" RPM High/Variable switch setting, but randomly turned on and off when in variable speed mode and the knob was turned. After the fact and with the benefit of 20/20 hindsight, I can now say with certainty that the following was indeed the fix for this particular problem. The faulty part that this whole posting is about (the potentiometer) is shown below:

To test my diagnosis, I began disassembling.
Here's your starting point:

First, I loosened the power cable restraining screws in order to expose the motor fan shroud screws:

Next, remove the four (4) screws which hold down the top half of the motor fan shroud and remove the top half of the fan shroud, noting for later that there's a little notch at the top to help alignment during reassembly:

Then remove the bottom half of the fan shroud assembly. It should come right off. Again, note the notch on the top for easier reassembly later:

Next, remove the four screws at the four corners in the picture below:

Just to be sure, these are the screws you're removing - I show them below in the "loosened" position:

Remove the screws, and you're ready to separate the two halves of the base:

Separate the two halves of the base. It may be sticky, but just apply gentle pressure around the edges until it comes apart. Note also the little rubber vibration dampener. These are shown separate in the next picture. During reassembly it's important to get them back on the edges.

Rubber vibration dampeners:

This is the part we're looking for - the potentiometer! Unfortunately, I decided to do this blog posting only after I'd already de-soldered and removed the leads. Note that initially this part had three legs, but the one on the right has been cut off by Vita-Mix before assembly - the third leg is not needed for this machine:

Before unbolting the potentiometer from the housing, unplug the leads (wires with little connectors on them) from the circuit board. The two closest connectors in the picture below are the ones you're looking for:


Remove the knob (this is the new Honeywell component already installed; as I said earlier I decided to do this blog post only after the fact, just imagine it's black instead of silver, ok?):

Using your 13mm deep-well socket, remove the nut holding in the potentiometer:

Now back inside the housing. This is the new component, already installed. This is where the soldering comes into play. Using your soldering iron, remove the two leads from the old potentiometer. Cut three pieces of heat-shrink tubing to length and slip the pieces over the wires before re-soldering the leads to the new component. !!!VERY IMPORTANT!!! Use the same left two terminals on the potentiometer as were used on the old part (the left two as you look down on the potentiometer) and leave the third (right) leg unused. Use a match or cigarette lighter to shrink the tubing onto the leads, using a shorter piece to protect the third unused leg:

Note how beefy and strong this Honeywell sweetheart is, compared to the weak sauce plastic original POS! Rated for 25,000 cycles, baby!
Simply reverse these steps to reassemble the unit. Only one "gotcha!" left to cover yet.
After reassembling the base, now we need to make sure the dial indicator knob is properly aligned with the appropriate speed setting. To do this simply twist the potentiometer input shaft as far counter-clockwise as it will go (until it stops). This will be the "1" speed position. Then without bumping or turning the input shaft, slide the indicator knob onto the shaft and align the white hash mark with the "1" position. Tighten the screw down and you're all set!
Now why after this is all said and done would I take the time to pass along all this valuable information to you, my internet friends? Well here's how my interaction with Vita-Mix went down...
After troubleshooting, I looked online for the Vita-Mix parts and service center. I saw that they charge $150 to fix pretty much any problem per event. Since the machine we own is 10 years old, it was not worth it to me to spend $150 on a repair - that's almost halfway to a new machine!
After disassembly and removal of the old potentiometer, I contacted Vita-Mix via email (their preferred method of contact) requesting a price quote on a new potentiometer, making sure to include all pertinent information such as serial number and even the part number printed on the side of the potentiometer. I received no reply for several days. I then called them up on their -800 number to order a new potentiometer. I was given a price quote of $147! My jaw dropped and I managed to recover my wits about me enough to ask "For crying out loud, why?! $147 for a simple potentiometer? Are you nuts?!" The gal on the other end of the line was nice enough to admit to me that the reason it's so expensive is to discourage folks from trying a DIY fix, and to encourage you to send it in to the repair center for $150. Bullshit, I say! Almost two weeks later, I received a reply email from their customer service department telling me I needed to call the -800 number. They couldn't possibly send in written form their insane price gouging, and they're right about that... I would have posted it here!
So, as revenge for their price gouging, I did several hours' worth of work here in order to provide you my internet brothers and sisters good information so that you can make an informed spending decision. Send your Vita-Mix in to be repaired for $150, or do it yourself for about $10.