I'm writing this blog entry because Vita-Mix is now officially on my shit list. The story will follow below, but the bottom line is that I want You The Owner to be able to fix your property yourself, and not have to pay Vita-Mix outrageous amounts of money to do a simple job like changing out a simple electrical component that really anyone could do. Bear in mind that what I show below voids the warranty. If you decide to open up your machine, it's your decision and your warranty. But I know this fix works for the indicated problem, and if you have this particular problem it will be worth it to you just for the feeling of empowerment it will give you to fix your own machine. The offending unit:

My wife bought this particular Vita-Mix 5000 at the Iowa State Fair about 10 years ago. She loves the thing, and it served us well until recently when the motor began running very erratically on the variable speed setting.
More disclosure: Fed Up Airline Pilot I may be, but my college degree is as a Laser Technician, and along with optics classes came a huge amount of electro-mechanical classes. In fact, just a couple of extra classes and I could have earned the Electronics Technician degree. The point is that I'm over-qualified to fix a blender, but it's really not rocket science, and I believe that anyone can do the same thing with proper guidance. You can do it! http://www.youtube.com/watch?v=VZ2HcRl4wSk
Tool list, all available at Radio Shack:
A medium Phillips screwdriver (the star one not the flat one)
A very small flat head screwdriver (the flat one not the star one)
A 13mm deep-well socket with associated ratchet wrench
Soldering iron and solder
Heat-shrink tubing
That's it, can you stand it!?
Parts list:
Go to www.alliedelec.com and order part number 70153162. It's about $8 plus shipping.
http://www.alliedelec.com/search/productdetail.aspx?SKU=70153162
Just in case the link breaks, what you're looking for is a potentiometer, linear 0-5K Ohm, 312 degree rotation, with .25" diameter input shaft. The stock Vita-Mix part is only .75 Watt, but this sucker's rated for 2 Watts. "More power!" - Tim the Tool Man Taylor
For full disclosure, this is just one part out of a thousand different components which will do the same job, but it's the one I chose and it works just dandy. Don't mess with success!
Troubleshooting the problem: Our Vita-Mix 5000 was acting like the variable resistor (potentiometer) was only making intermittent contact with the speed control board. The motor ran fine on the "High" RPM High/Variable switch setting, but randomly turned on and off when in variable speed mode and the knob was turned. After the fact and with the benefit of 20/20 hindsight, I can now say with certainty that the following was indeed the fix for this particular problem. The faulty part that this whole posting is about (the potentiometer) is shown below:

To test my diagnosis, I began disassembling.
Here's your starting point:

First, I loosened the power cable restraining screws in order to expose the motor fan shroud screws:

Next, remove the four (4) screws which hold down the top half of the motor fan shroud and remove the top half of the fan shroud, noting for later that there's a little notch at the top to help alignment during reassembly:

Then remove the bottom half of the fan shroud assembly. It should come right off. Again, note the notch on the top for easier reassembly later:

Next, remove the four screws at the four corners in the picture below:

Just to be sure, these are the screws you're removing - I show them below in the "loosened" position:
Remove the screws, and you're ready to separate the two halves of the base:

Separate the two halves of the base. It may be sticky, but just apply gentle pressure around the edges until it comes apart. Note also the little rubber vibration dampener. These are shown separate in the next picture. During reassembly it's important to get them back on the edges.


Next, using your small flat head screwdriver, loosen the small screw holding on the knob:

Remove the knob (this is the new Honeywell component already installed; as I said earlier I decided to do this blog post only after the fact, just imagine it's black instead of silver, ok?):

Using your 13mm deep-well socket, remove the nut holding in the potentiometer:


Now back inside the housing. This is the new component, already installed. This is where the soldering comes into play. Using your soldering iron, remove the two leads from the old potentiometer. Cut three pieces of heat-shrink tubing to length and slip the pieces over the wires before re-soldering the leads to the new component. !!!VERY IMPORTANT!!! Use the same left two terminals on the potentiometer as were used on the old part (the left two as you look down on the potentiometer) and leave the third (right) leg unused. Use a match or cigarette lighter to shrink the tubing onto the leads, using a shorter piece to protect the third unused leg:

Note how beefy and strong this Honeywell sweetheart is, compared to the weak sauce plastic original POS! Rated for 25,000 cycles, baby!
Simply reverse these steps to reassemble the unit. Only one "gotcha!" left to cover yet.
After reassembling the base, now we need to make sure the dial indicator knob is properly aligned with the appropriate speed setting. To do this simply twist the potentiometer input shaft as far counter-clockwise as it will go (until it stops). This will be the "1" speed position. Then without bumping or turning the input shaft, slide the indicator knob onto the shaft and align the white hash mark with the "1" position. Tighten the screw down and you're all set!
Now why after this is all said and done would I take the time to pass along all this valuable information to you, my internet friends? Well here's how my interaction with Vita-Mix went down...
After troubleshooting, I looked online for the Vita-Mix parts and service center. I saw that they charge $150 to fix pretty much any problem per event. Since the machine we own is 10 years old, it was not worth it to me to spend $150 on a repair - that's almost halfway to a new machine!
After disassembly and removal of the old potentiometer, I contacted Vita-Mix via email (their preferred method of contact) requesting a price quote on a new potentiometer, making sure to include all pertinent information such as serial number and even the part number printed on the side of the potentiometer. I received no reply for several days. I then called them up on their -800 number to order a new potentiometer. I was given a price quote of $147! My jaw dropped and I managed to recover my wits about me enough to ask "For crying out loud, why?! $147 for a simple potentiometer? Are you nuts?!" The gal on the other end of the line was nice enough to admit to me that the reason it's so expensive is to discourage folks from trying a DIY fix, and to encourage you to send it in to the repair center for $150. Bullshit, I say! Almost two weeks later, I received a reply email from their customer service department telling me I needed to call the -800 number. They couldn't possibly send in written form their insane price gouging, and they're right about that... I would have posted it here!
So, as revenge for their price gouging, I did several hours' worth of work here in order to provide you my internet brothers and sisters good information so that you can make an informed spending decision. Send your Vita-Mix in to be repaired for $150, or do it yourself for about $10.

My wife bought this particular Vita-Mix 5000 at the Iowa State Fair about 10 years ago. She loves the thing, and it served us well until recently when the motor began running very erratically on the variable speed setting.
More disclosure: Fed Up Airline Pilot I may be, but my college degree is as a Laser Technician, and along with optics classes came a huge amount of electro-mechanical classes. In fact, just a couple of extra classes and I could have earned the Electronics Technician degree. The point is that I'm over-qualified to fix a blender, but it's really not rocket science, and I believe that anyone can do the same thing with proper guidance. You can do it! http://www.youtube.com/watch?v=VZ2HcRl4wSk
Tool list, all available at Radio Shack:
A medium Phillips screwdriver (the star one not the flat one)
A very small flat head screwdriver (the flat one not the star one)
A 13mm deep-well socket with associated ratchet wrench
Soldering iron and solder
Heat-shrink tubing
That's it, can you stand it!?
Parts list:
Go to www.alliedelec.com and order part number 70153162. It's about $8 plus shipping.
http://www.alliedelec.com/search/productdetail.aspx?SKU=70153162
Just in case the link breaks, what you're looking for is a potentiometer, linear 0-5K Ohm, 312 degree rotation, with .25" diameter input shaft. The stock Vita-Mix part is only .75 Watt, but this sucker's rated for 2 Watts. "More power!" - Tim the Tool Man Taylor
For full disclosure, this is just one part out of a thousand different components which will do the same job, but it's the one I chose and it works just dandy. Don't mess with success!
Troubleshooting the problem: Our Vita-Mix 5000 was acting like the variable resistor (potentiometer) was only making intermittent contact with the speed control board. The motor ran fine on the "High" RPM High/Variable switch setting, but randomly turned on and off when in variable speed mode and the knob was turned. After the fact and with the benefit of 20/20 hindsight, I can now say with certainty that the following was indeed the fix for this particular problem. The faulty part that this whole posting is about (the potentiometer) is shown below:

To test my diagnosis, I began disassembling.
Here's your starting point:

First, I loosened the power cable restraining screws in order to expose the motor fan shroud screws:

Next, remove the four (4) screws which hold down the top half of the motor fan shroud and remove the top half of the fan shroud, noting for later that there's a little notch at the top to help alignment during reassembly:

Then remove the bottom half of the fan shroud assembly. It should come right off. Again, note the notch on the top for easier reassembly later:

Next, remove the four screws at the four corners in the picture below:

Just to be sure, these are the screws you're removing - I show them below in the "loosened" position:

Remove the screws, and you're ready to separate the two halves of the base:

Separate the two halves of the base. It may be sticky, but just apply gentle pressure around the edges until it comes apart. Note also the little rubber vibration dampener. These are shown separate in the next picture. During reassembly it's important to get them back on the edges.

Rubber vibration dampeners:

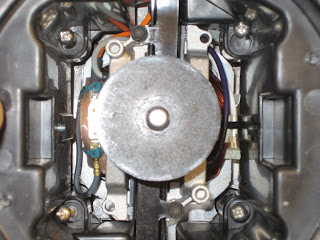
This is the part we're looking for - the potentiometer! Unfortunately, I decided to do this blog posting only after I'd already de-soldered and removed the leads. Note that initially this part had three legs, but the one on the right has been cut off by Vita-Mix before assembly - the third leg is not needed for this machine:

Before unbolting the potentiometer from the housing, unplug the leads (wires with little connectors on them) from the circuit board. The two closest connectors in the picture below are the ones you're looking for:


Remove the knob (this is the new Honeywell component already installed; as I said earlier I decided to do this blog post only after the fact, just imagine it's black instead of silver, ok?):

Using your 13mm deep-well socket, remove the nut holding in the potentiometer:

Now back inside the housing. This is the new component, already installed. This is where the soldering comes into play. Using your soldering iron, remove the two leads from the old potentiometer. Cut three pieces of heat-shrink tubing to length and slip the pieces over the wires before re-soldering the leads to the new component. !!!VERY IMPORTANT!!! Use the same left two terminals on the potentiometer as were used on the old part (the left two as you look down on the potentiometer) and leave the third (right) leg unused. Use a match or cigarette lighter to shrink the tubing onto the leads, using a shorter piece to protect the third unused leg:

Note how beefy and strong this Honeywell sweetheart is, compared to the weak sauce plastic original POS! Rated for 25,000 cycles, baby!
Simply reverse these steps to reassemble the unit. Only one "gotcha!" left to cover yet.
After reassembling the base, now we need to make sure the dial indicator knob is properly aligned with the appropriate speed setting. To do this simply twist the potentiometer input shaft as far counter-clockwise as it will go (until it stops). This will be the "1" speed position. Then without bumping or turning the input shaft, slide the indicator knob onto the shaft and align the white hash mark with the "1" position. Tighten the screw down and you're all set!
Now why after this is all said and done would I take the time to pass along all this valuable information to you, my internet friends? Well here's how my interaction with Vita-Mix went down...
After troubleshooting, I looked online for the Vita-Mix parts and service center. I saw that they charge $150 to fix pretty much any problem per event. Since the machine we own is 10 years old, it was not worth it to me to spend $150 on a repair - that's almost halfway to a new machine!
After disassembly and removal of the old potentiometer, I contacted Vita-Mix via email (their preferred method of contact) requesting a price quote on a new potentiometer, making sure to include all pertinent information such as serial number and even the part number printed on the side of the potentiometer. I received no reply for several days. I then called them up on their -800 number to order a new potentiometer. I was given a price quote of $147! My jaw dropped and I managed to recover my wits about me enough to ask "For crying out loud, why?! $147 for a simple potentiometer? Are you nuts?!" The gal on the other end of the line was nice enough to admit to me that the reason it's so expensive is to discourage folks from trying a DIY fix, and to encourage you to send it in to the repair center for $150. Bullshit, I say! Almost two weeks later, I received a reply email from their customer service department telling me I needed to call the -800 number. They couldn't possibly send in written form their insane price gouging, and they're right about that... I would have posted it here!
So, as revenge for their price gouging, I did several hours' worth of work here in order to provide you my internet brothers and sisters good information so that you can make an informed spending decision. Send your Vita-Mix in to be repaired for $150, or do it yourself for about $10.
I just discovered the same problem on a 2006 model 5000. Vitamix made the same offer since the warranty was only 3 years in 2006. I told them I'd already ordered the $8 part and had the step by step repair procedure from a generous person on the internet. I'll give another brand serious consideration when we need a new blender. Thank you very much for your help!!
ReplyDeleteI've taken my VitaMix apart and discovered the potentiometer issue myself. I was Googling "VitaMix Potentiometer" and found your blog. I've ordered the part and now my wife gets a 'new' VitaMix for Christmas - or rather, she gets to use it again. Thank you for making it easy and posting the part # online.
ReplyDelete- Joel Helgeson
Minneapolis, MN
Thank you for creating this blog. It was such as easy fix. I bought the potentiometer at http://www.newark.com/honeywell-s-c-clarostat/rv4naysd502a/potentiometer-cond-plastic-5kohm/dp/01F2643?in_merch=Popular%20Products. Their service was excellent. VitaMix wanted $60.00 for the potentiometer with a requirement that I sign a waiver before I could buy the part. The only alternatives that they offered were a repair for $190 or a credit of $100 to buy a new machine. This new part is of much higher quality than the OEM and will most likely outlast the motor.
ReplyDeleteVery nice write-up. I have a ~7.5 year old machine that this is starting to become a minor issue on. I'm glad that there's a straightforward fix available in case I need it!
ReplyDeleteI guess Vitamix really doesn't want you to open up the base yourself!
Thanks for helping out an Internet buddy from Victoria, BC. Greatly appreciate your post! Part is on order...
ReplyDeleteFedUpAirlinePilot, thanks for posting this info. I have a Vitamix that has been preprogrammed for Starbucks. Not useful for me as is. I want to add a potentiometer so that I can manually control the speeds, but after reading your post, I see that I will also need a variable speed circuit board. Can such a thing be gotten cheaply, or am I out of luck? Would greatly appreciate any help ... You can reach me at mcgee451@hotmail.com. Thanks!
ReplyDeleteThank you. My machine is 8 years old and was already fixed once under warranty for this very issue. It is just now starting to happen again and I will be able to fix it on my own now. Thanks for your post.
ReplyDeleteThanks so much for the excellent "how to" instructions. There's a great self-satisfaction in doing it yourself and in avoiding being ripped off by Vita Mix !!!
ReplyDeleteAwesome, thanks You are the Man.
ReplyDeleteThanks for the info! Mine did the same thing...my husband fixed it thanks to you!
ReplyDeleteHi. Thanks very much for the info. I live in Canada. I was able to find the exact switch that was in my VM5000 on the web at ARROW Electronics Canada LTD. Part # PCW1J-C24-SL0/035L.
ReplyDeleteBTW: I was able to remove the top of the Vitamix simply by removing the four screws under the rubber mat at the top.
Works perfectly.
Also. The part mentioned above was only $ 0.39 plus shipping.
ReplyDeleteMany thanks - I experienced your same problem with the appliance, and the same outrageous response from Vita-Mix regarding parts/repair. I followed your thorough and well presented instructions and am back in business! DIY is always quite satisfying, but especially so under the circumstances herein. Thanks again!!
ReplyDeleteDude....
ReplyDeletethis was the best and easiest fix for my Vitaprep! All and all I spent about 30 bucks! Sooooo easy! thanks a lot! I did take the advice of Lance and remove the 4 screws under the rubber mat and it saved all kinds of time.. thanks again!
running like a champ!
Thank you very very much. I love the vita mix power and construction but I am wholly dissapointed in their customer service. If you wanna charge $500 for a blender you need to support the folks that were loyal enough to shell out for it. Although an owner of a vita mix I have begun discouraging would be buyers based on my experience. I am sure that I have cost them more than 5 blenders at COSTCO demo's. At least I can now offer a DYI alternative to the ripoff that vita mix has become.
ReplyDeleteThanks.
Just found this blog...wonderful! We bought this mixer to make baby food for my now 14 year old son. Sad to say that we also go our fist container leak around the same time I noticed the speed issue. I'm fixing both this week!
ReplyDeleteIf your container is leaking, it is one of 2 things - Either the plastic container is cracked - aka replace the whole thing; Or the gaskets on the blade kit have failed - buy a new blade kit. (if you are buying a new blade, make sure you get the right kind- Vitamix sells 3 different profiles: An Ice blade for ... you guessed it, ice (smoothies). A "Dry" blade for grinding flour from whole grains. And the default "Wet" blade for everything else.)
DeleteWill pay you to fix mine!
ReplyDeleteGreat tutorial. Worked like a charm. Thanks for taking the time to post this most helpful information.
ReplyDeleteJim L.
Wow! I haven't checked this posting since I wrote it, having sent it out into the universe with nary a thought thereafter. It was excellent therapy for me to publish this fix, and I'm extremely gratified that the information has been valuable to so many brave do-it-yourselfers. Thanks for all the great comments, I'm certainly glad this post has been of use!
ReplyDeleteMy Super 5000 just a bit different from your posting.A 5/64" Allen Wrench to remove top female drive piece, remove four Phillips screws to remove top piece, it pops right off to give you access to Potentiometer. Got mine fro Parts Town, Part Number VM15955, it comes complete wiring wiring harness.
DeleteI just finished the fix on a 5000 found on craigslist. Your instructions were great. The only difference was that my case screws were under the rubber on the top of the unit. Thank you so much!!!
ReplyDeleteMy unit was also like this. An easy fix with your instructions. Many thanks
DeleteThank You fix mine under ten minutes. Great to find the part to replace. I was surprised that such a big name would use such a cheap part.
ReplyDeleteJust finished and viola! It is fixed and running like a champ! A little miffed at allied parts for charging $20 for their $8 part. But overall, 20 bucks for any repair is a deal. Thanks for posting this solution with very clear instructions! David
ReplyDeleteThis comment has been removed by the author.
ReplyDeleteThanks so much for this fix. Worked like a charm. My only problem is the knob no longer fits and I can't seem to find a similar one locally. Did anyone else have to replace the knob? The original knob isn't as deep on mine and is not a quarter inch. I'd love to know where I can order one.
ReplyDeleteMe too - just finished replacing my potentiometer. Vitamix used a D-shaft and my replacement was round. I can grind the shaft to fit but that seems like a lot of work when a round shaft with a set-screw must be available out there somewhere.
DeleteThank you sir. I'm so sick of these kind of rip-offs. $60 for an $8 part. What a simple repair that they now want $200 for, and I would have to pay to ship it to them and for the return shipping. Thanks again...
ReplyDeleteThanks so much for this guide, it's a huge help, but I have a question. I got my potentiometer and tools and opened up my Vitamix only to discover two things different. All three terminals on the pot have wires connected and all three are soldered to the circuit board. The question is would I be ok connecting the wires to the new pot just as they are on the old?
ReplyDeleteSame model?
DeleteYes, same model.
DeleteThis comment has been removed by the author.
DeleteI am so glad to have found this. My mother in law gave me her old one as she bought a newer model. She swears by them and I was having trouble paying the asking price.
ReplyDeleteThanks for the information. Your therapy was helpful to many of us!
Mine has some kind of security screw in the base! I can not get them out. Anyone have any ideas if there is a tool or another way to remove them?
ReplyDeleteAll 4 of them
I just opened my unit up to find yet another Vitamix bit of manufacturing ingenuity. The four screws that hold the motor bracket assembly have been changed. they are no longer easily removable phillips head style. It seems they have save yet another milli-penny and gone to head-less screws that have a notch clipped out of them for a drive tool. this drive tool is not in the standard handyman tool box.
ReplyDeleteBeautiful post on the unit and the fix. You tell it like it is. Still getting there with mine, but it will take me more than 10 minutes.
... no, your screws are on the top of your blender. that is the bottom of your screws that you see :P
DeleteNope, I have this issue too, only headless fasteners I've been working on for a little while now. Might not even screw in, might be rivet-like.
DeleteI managed to pull the fasteners out-- barbed plugs, they do NOT want to come out! Made a little mess but it will be on the bottom. Onward!
DeleteYep. You are goooood! I have had the SAME issue with VM and have been trying to locate a part that will work. Good on you.
ReplyDeleteThe screws are there, just put in from the top. Turn the motor base upright and remove the square rubber part on the top that holds the blender cup. Screws come out the top.
ReplyDeleteI discovered that fact tonight as I was taking mine apart to replace the pot. Looks like VitaMix changed the motor cover design slightly.
ReplyDeleteMine is a 5200 (mfg 2008) - I went in thru the top - remove the rubber base and see the 4 case screws. My neighborhood Radio Shack did not have a 5K pot that would work, so I found the original Bournes on line at Digi-Key for $6 inc shipping, part number PCW1J-C24-KAB502L-ND
ReplyDeletePS - on mine the 4 case screws were standard phillips head.
DeleteThanks mine was doing the same thing - 5200 model. Waiting for part to arrive. Digikey also has the part, select usps shipping and its only $3.00 shipping http://www.digikey.com/product-search/en?x=19&y=18&lang=en&site=us&KeyWords=RV4NAYSD502A
ReplyDeleteFYI to the author - $147 happens to be the exact price for the full circuit board assembly and potentiometer, not just the potentiometer - perhaps the tech misunderstood the request
ReplyDeletehttp://www.partstown.com/vita-mix/vm15762
ReplyDeleteproof as per above
Thanks for the digikey link! and thanks for confirming my suspicions of the issue. Vitamix made a big mistake using this crappy part on their expensive mixers. They made an even worse mistake when they decided to try to gouge their customer base when trying to fix the issue caused by their bad component choice.. We can get equivalent cust service from China, hello Ninja!
ReplyDeleteOur Vitamix pot went out, did without a blender, bought a $10 blender from Walmart which worked almost as well, then finally sprang for the three blade Ninja with two single serve cups $150. Ninja beats the Sox off the $600 Vitamix! I'm going to fix the Vitamix just for the principle of having a machine that expensive/powerful that doesn't work. Torque my jaw that they charge so much for QUALITY, then compromise the product with a part that cost so little! I'll never buy another Vitamix, and will discourage anyone else from doing so as well!
DeleteThanks so much for this info! I've ordered the part and will return when I have the part installed. :)
ReplyDeleteGreetings everyone! So it seems that Vita-Mix has gone to the trouble of making this repair more difficult for some owners by installing security screws in order to prevent this (and other) fixes from being easy. I will certainly be keeping this additional insult to the DIY-er in mind the next time I go to purchase a blender, and you would be wise to do the same. I realize every model number is a bit different, and unfortunately it would be irresponsible of me to try and give advice on these different models as I can't verify the fix myself before passing an approved procedure along to you. Very sorry for this. Also, you a bit of searching on the mentioned electronics parts suppliers' websites and you can find many different versions of knobs for those of you who were asking about other diameters of input shaft.
ReplyDeleteIf you get the newer ones, or one of the commercial ones, the screws are easy to locate.. right under the rubber bumper pad on the top of the blender. As a DIY'er, i love vita-mix blenders- any part that fails can be easily replaced, unlike those blendtec monstrosities. Best place to find vita-mix parts (and exploded diagrams) are sites like partstown.com and etundra.com .
DeleteIt is nice to see a good post take on a life of its own. I was not alone with these issues... so glad to join the crowd!
ReplyDeleteGot the switch wires mixed during cleaning and assembly. Can anyone supply a photo of them?
There is a contact, some sort of safety contact switch that for the life of me cant seem to figure out what holds the contact down. Otherwise its an open curcuit. The contact switch is mounted on the motor and can be seen by the bottom cover taken off. Can someone tell me what part keeps that part together. I cant seem to see any part of the covers that keep it together. Help please.
ReplyDeleteIt may be a thermal break. It's normally open-- but during overheating the metal tang bends, closing the contacts to stop the circuit. After a cooling period it opens anew! Can send a photo of it, see my previous reply for e mail. Thanks...
Deleteit is actually normally closed, not normally open. you need one rated for 90°C, 125VAC. it is vitamix part number 824 and it usually costs $12-$15.
DeleteThank you so much for these instructions. My Vitamix is now back up and running like new. Very smooth repair thanks to your great directions.
ReplyDeleteI've got the fix done and it works great! My only problem is that I have one of the "notched" knobs on my vitamix (not the kind with the set screw) so I had to order a new knob that would fit on the Honeywell speed control. Now that I did that it works perfectly. I love having the smooth speed control again .Thank you so much for posting this! Please don't ever take this post down :)
ReplyDeleteThanks, the repair was simple and easy with your instructions. Machine runs smoothly once again.
ReplyDeleteAgain, thanks for sharing.
Thank you so much for sharing this repair with the world. Not only was it simple, it was also inexpensive. Thanks for empowering Vitamix users with your money saving fix. You may have started a movement.
ReplyDeleteAm SOOOOO happy to have found this blog! I think my VitaMiix is about 20 Years old, and I've just decided to start using it again. Hubby looked it over for me, and discovered the bad switch immediately. I was searching for the part when I found you instead (as well as the beefed up Honeywell replacement part). Will let you know how it goes; thank you so much!
ReplyDeleteThanks for this great post!! I found this post after ordering the potentiometer for my 10 year old Vita-Prep from Amazon.
ReplyDeletehttp://www.amazon.com/gp/product/B00HNQDIYO/ref=oh_details_o00_s00_i00?ie=UTF8&psc=1
For mine, it was unnecessary to remove the bottom fan shroud as the screws were under the rubber mat on the top. Just lift it up over the drive and the 4 normal phillips screws are recessed.
Thanks Again!!
Hello, My Vitamix is about 20 years old, and the Speed Pot seems to be very loose feel when turning, my machine also has an Orange Light on Front next to Variable Switch, that lights up when in Variable Mode....my machine stopped on me this morning as I was making a smoothie, and will not turn on again, I have lifted off the Rubber Matt that container sits on, and there is 4 phillips screws beneath it, I loosened all 4 screws, but the top part of the Base Casing is not lifting off, or separating from the bottom half easily for me. I am trying not to force anything. Did your separate easily once you loosened the 4 Phillips Screws under the Rubber Matt on top of the Base?? Thanks for your Help in advance!! Best, Ray
Deletehmm. does your vitamix have a drive socket at the top? they look like this: http://ecx.images-amazon.com/images/I/31A-uAiiD%2BL._SY300_.jpg
Deleteif it does, you will need to use an Allan wrench to loosen the set screw that is holding the socket to the motor.
Either way, if your vitamix has not been opened since it was made, you will probably have to use quite a bit of force to separate the two halves. Those rubber vibration dampeners are press-fit, and they hold the case together pretty securely.
Thanks for getting back to me!! Yes, I did remove the Drive Socket, and inserted a Flat Driver between the 2 Halves, and began to gently twist, and took some time and effort, but finally got the 2 Halves apart. Now, to mention my problem. I was expecting to see a Burned Capacitor, or Diode, maybe resistor, etc.....but no. No damaged componnents......What I found was that the Motor Brushes are charred, and melted a bit on both of them. Also, the Thermal Overload Protector "Popped Open", and remains that way......It didn't do it's job anyway.....or I would not have had the "Popping Noises, Motor Bogging Down, and Smoke pouring out the Bottom of the Base".....I Plugged it back in now, while it's Open like this, and I jumped the wires together over the Thermal Protector part, and that had no effect on the Machine, It still is not even trying to Start. I don't know if the Issue is just a new Thermal Breaker Part, and Motor Brushes....or if the Whole Motor Burned Out?? I don't know how to figure that out? Do you have any ideas?? I found a link on Internet about a Vitamix Bar Boss Commercial Electronic Unit, for Bars, that has a lot of issues and shutdowns due to failed Motor Brushes....but I can't find too much on the Vitamix Blenders like ours,. I see those Supply Places do sell both, the Thermal Protectors, and the Motor Brushes...but was curious of a way to possibly troubleshoot, or test the Motor to find out if it's dead, or maybe the Brushes? I appreciate any help if you may have any ideas? Thank You, Ray!!
DeleteChock up another lost job for the Vitamix repair shop. The sense of accomplishment was well worth the entry fee for the tools and parts, and I am well armed to do a series of such repairs in the future. I now own a new battery operated soldering iron to boot. I looked for a small appliance repair shop in town (Kelowna B.C.) to see if I could source the potentiometer locally but no cigar. I learned the true extent to which we have become a throw away society. The shop here moved to Vancouver and couldn't make it there. I ordered all the tools and parts I needed from Newark.com and they arrived in 3 days from Gaffney SC. Gratifying experience all around. Thank you for the post and the wonderful instructions.
ReplyDeleteThe reason that Vitamix quoted you $147 is not that they were trying to gouge you or make you use their repair service, but rather that they don't sell the potentiometer separately from the control board. The part number for the whole assembly (control board and potentiometer) is 15762. Their reasoning is that the control is rated for about the same number of cycles as the parts on the control board, so when you need to replace one, you will need to replace the other relatively soon.
ReplyDeleteso glad to find this blog - thank you!! the thing is apart first to make sure I could figure that much out and now the part is on the way and will be back with an update as soon as it's done. BTW, I'm a woman trying this so we'll see what happens :)
ReplyDeleteThanks for this info. I had the same problem, but on HIGH as well. Anyway, to be fair to Vitamix, they make a good machine in the USA, but don't elect to perform cheap repairs and incur all of the costs that would entail. They have a system that works for them and I don't have a problem with that. After all, they do have a 5 year warranty! You sure don't get that with the offshore machines! Right? BTW, I'm an old Flying Tiger guy (DC8-63-F).
ReplyDeleteI have had that problem for months now and it is getting so bad that I thought I would have to chuck my vitamix, but I love it and can't find a better mixer and I really didn't want to buy a new one. Thank You so much for posting this. I have not fixed it yet but did order the part and cant wait to get it back to good working order. Vitamix offers such quality products, its a shame their customer support does not match the quality of their product. That is usually a sign of higher quality when you can buy parts and not have to purchase a whole new machine. Thanks again, so glad you shared your expertise with us. Vitamix should hire you to make repair videos for them. :)
ReplyDeleteHello All,
ReplyDeleteI have to give a "BIG" Thumbs Up to Vitamix Customer Service!!! My Vitamix Super Total Nutrition Center is 21 Years Old....and Well "Out Of Warranty" ...15 Years Ago my Warranty Ended. Well, just recently my Container was leaking Black Oil mixed with Smoothie...a new Container would have costed me $175.00....however, seeing that I never made a Warranty Service Claim, Vitamix Customer Service sent me a Brand New Wet Container, 64 Oz. with the New Blade installed. Complete, for Free!!! I was so happy I started really getting in more Nut Milks and Nut Butters.....I wound up missing a Coconut Shell, large, and my Motor Base began spinning at different speeds, eventually slowing down, to a Stop.....and then Smoking!! It was to Never Start Again....even after Cooling! So I contacted Customer Service Again....told of my experience, and once again....They told me to mail my whole Machine, with Container into Vitamix, for a "1-Time" Courtesy Repair, and I did, they completely gutted my Unit, Basicallyu, it's a New 5200 Machine, the Housing, Switches, Motor, Speed Board, Speed Potentiometer, and other Parts, All New!! I had a New Machine within a Weeks Time.....and once Again....No Charge to Me At All......So, in Return, I said that I'd share my experience on Boards that I Post On. I'm Very Happy With Vitamix Machine.....and Service!! Ray, NJ
Took a bit longer than expected but bottom line...success! Only adjustment is shaft on new potentiometer is larger than knob. Going to attempt to drill it out...very carefully. Anyway thanks Mr Pilot.
ReplyDeleteThank you it works great
ReplyDeleteHere is another DYI tip.
ReplyDeleteA couple of years ago the bearing for the blade seized up. The bearing/blade assy was about $70.
I pulled the bearings out and found out they are the same part number and identical as some inline skate wheel bearings I had in the basement. They were available on ebay and Amazon for about $3.
Mike
Love the Can Do, DIY here.
ReplyDeleteThe bearings are bad in my container blade assy - anybody know what specs of bearings to look for? (I don't have any inline skates!)
Thanks,
David
These are from Amazon:
Deletehttps://www.amazon.com/TIMESETL-Bearings-Miniature-Skateboards-Scooters/dp/B0872ZT4JY/ref=sr_1_11?dchild=1&keywords=609rs&qid=1633723512&sr=8-11
Your solution works great, thanks so much!!!
ReplyDeleteDoes anyone know where to get a wiring diagram for a Vitamix 5000?
ReplyDeleteI was able to cobble one together from some pics I found on a Spanish web site:
Deletehttp://www.dtforum.info/index.php?topic=121280.0
I plan on posting my results of converting a Turboblend 4500 to a variable speed model for $50.00:-)
I would be very interested in this project. I need a variable speed blender but my vitamix is the old two speed type. My email address: jfwdc@sbcglobal.net
DeleteHi there Samwise-
DeleteI too would be very interested to find out the results of your conversion from the turboblend 4500 to a variable speed vitamin. I have a turbo and want a variable speed. If you conversion worked (amazing btw!!!), I'd be delighted to read your tutorial, or possibly view your video. Let me know!! agoldma@gmail.com
THANKS!
This is very informative, Thanks I will now fix my vitamix It is 10 year old vitamix wanted more than half what I paid it is rediculous.
ReplyDeleteWish I had seen this first. Your description of the problem was spot-on. Now I have an extra set of brushes which, by the looks of my old brushes, won't need to be installed for another 50 at the rate I'm using them. Thanks for the detailed instructions and the site/part-number for the new pot. By the way, folks, there are several configurations by which the two halves are screwed/bolted together. My machine had the four screws coming out of the top. The two two halves can be rather stubborn about coming apart. Be carefully forceful and you'll eventually win out.
ReplyDeleteUpdate: Can't wait for a new potentiometer? Try cleaning it! I've ordered my new pot but I thought, "Why not try to clean it? Perhaps some stuff got knocked loose inside the pot, causing the sporadic behavior." So I got out a can of QD Electronic Cleaner (sold at Amazon or probably any auto parts store or equivalent cleaner at Radio Shack) and sprayed it in the two little holes that I found in the potentiometer. I also carefully inserted the TIP of my small pocket knife into the back of the pot, prying the back of the pot off of the case just enough to let the cleaner flush through. Do this with the pot turned to both extremes and in between. I put the Vitamix back together and it's seems to be working perfectly now. Not sure how long it'll last so I'll install the new pot when it arrives.
ReplyDeleteI see that RadioShack has a similar Potentiometer rated at 0.5 watts. Can this one work? Will the results be less power/rpm's?
ReplyDeletehttp://www.radioshack.com/5k-ohm-linear-taper-potentiometers/2711714.html
If the pot resistance is the same, there should be no effect on power/RPMs. But, the watt rating is how much power can be handled my the resistor. It could overheat and fail. It shouldn't hurt to try, but you are betting on the Vita-Mix guys over-designing the part. Not an altogether bad bet, but not a guarantee.
DeletePersonally, since we are talking a couple of bucks at most, I'd use a pot of at least the existing 3/4 watt rating.
I just replaced my potentiometer, thanks to you!
ReplyDeleteExcellent instructions. Worked perfectly for me. Thanks for posting these. Much appreciated! Blessings!
ReplyDeleteGreat instructions, pot arrived today, fix was easy and i enjoyed some fresh blent lemonade all in one night. I rescued my mom's 5000 from being donated and brought it to college with me. And now i have a nice working blender! Thank you so much!
ReplyDeleteGreat instructions, pot arrived today, fix was easy and i enjoyed some fresh blent lemonade all in one night. I rescued my mom's 5000 from being donated and brought it to college with me. And now i have a nice working blender! Thank you so much!
ReplyDeleteDo you think if would be possible to add a potentiometer to the vitamix two-speed? Upgrading it to a 5200?
ReplyDeleteIt's not that simple. The pot acts as a rheostat to govern what is probably a pulse-width-modulation circuit that controls power to the motor. There may also be an op-amp that uses feedback from the motor to adjust output as motor load varies. In other words, you'd need the speed-control circuit board as well. I am not familiar with the innards of the two-speed model, but I would be surprised if it had such circuitry whose functionality could be enhanced by the simple addition of a pot/rheostat.
DeleteDoes anyone have the wiring diagram/schematic for the vitamix? Mine is a 5200. I made the fatal mistake of removing the wires from the variable speed switch (not the potentiometer) when i had to replace it and now I can' get the speed to adjust on the "Variable" setting. Potentiomenter is not the problem. resistance adjusts properly when checked with my multimeter.
ReplyDeleteI just fixed my 10 year old Vitamix "Super 5000" with these instructions. Thank you so much!!! I ordered the same Honeywell potentiometer from Jameco (shipping to Canada was less expensive than from alliedelec.com). Like some other folks, I opened the casing via the screws at the top under the rubber flap. The most difficulty I had was with the stability tab on the new potentiometer when putting it in its final position. It was a little too wide for the slot in the casing. A bit of bending and brute force seemed to solve that. I also had to get a new knob but I was able to find one easily at a local elecrtonics store. No previous experience with soldering, etc but the job took about 2 hours. Great instructions!
ReplyDeleteMy wife and I own the 5000, and we are experiencing the same stop & go operation. However, we also have the additional problem tha when we flip the variable/high speed switch to "High" the unit shuts off, like we just unplugged it. Flipping the switch back to "variable" the unit comes on. I am guessing that the "High" setting is breaking contact, meaning a new one is probably the fix. Any other Vitamix 5000 owners or any others with THIS problem? Thx in advance!
ReplyDeleteJim W.--Sullivan, IN
I just changed my potentiometer, following your directions, but it still does not have variable speed:(
ReplyDeleteIt must be something else, or the part I got was defective.
Could it be the switch for the High/Variable control? I checked online and found one for $18.00 plus shipping. Will try that. I would rather be able to control using only the variable speed dial. Could it be something wrong with the circuit board?
ReplyDeleteThank you for your clear instructions. You have done us all a great service. R. Marks
ReplyDeleteMy 10 year Old vita mix had the potentiometer starting to go out, as it was not very smooth. Then one day, it just wouldn't turn on. Do you think the faulty potentiometer would make it not turn on at all? We didn't wear out the moter... Thanks for the great instructions!
ReplyDeleteAnother satisfied customer. You've restored my Vitamix to variable speed capability!
ReplyDeleteThis comment has been removed by the author.
ReplyDeleteVitamix 5000 variable speed fully repaired. Thanks for posting! However, we did end up with a high pitched whine on the lower speeds - anyone else get this?
ReplyDeleteThank you so much for sharing this great data, I also fixed my Vitamix 5000 with exactly the same problem and solution. Saved myself $85 and was fun to do the repair! :)
ReplyDeleteThanks for the blog. As an EE, I expected there's probably just an inexpensive potentiometer in there.
ReplyDeleteI would never have guessed $150 for service though!
Now I'll see what my employer has in our engineering stockroom :-)
Tom
Follow up: Thanks again for the information. It took me less than 20 minutes to fix the unit.
ReplyDeleteThe only pot I found readily was 1/2 watt, and it's working fine. The wiring to that pot is pretty small, probably 22 ga, so the current is most likely very small as well.
Wow, I don't consider myself particularly handy, and would not have attempted this repair without your excellent blog. Thanks so much, my VitaMix no works like new!!
ReplyDeleteWow, I don't consider myself particularly handy, and would not have attempted this repair without your excellent blog. Thanks so much, my VitaMix no works like new!!
ReplyDeleteOrdered from Amazon, was $13 with shipping for Honeywell version, I'll get it Friday and get on the fix.
ReplyDelete---ssb
My Vitamix 5000 is 11 years old. I just started noticing the intermittent speed problem. It's sounds like it is this potentiometer issue. Today it completely stopped. I went through the customer service, high-cost, overhaul. Today, after reading this, I chose to open it up. I found that a wire from the main switch to the motor magnet broke off. So, I soldered it back on and it works. Now I know I can also fix the potentiometer. Thank-you Mr. Pilot!
ReplyDeleteThis comment has been removed by the author.
ReplyDeletei have a two speed and need a wiring diagram for the on/off-hi/lo switches. Can anyone help ?
ReplyDeleteI too had the potentiometer go out. To replace I pulled the black rubber cover off the top of the machine, unscrewed the four screws and pulled the case apart. I had sufficient room to get in and replace the part. I got my part from Newark at 800-463-9275 Honeywell part # RV4NAYSD502A
ReplyDeleteGood luck
Wow! Great post! I'm sure that's exactly what's wrong with our VitaMix since it has the same symptoms as yours did before your fix. Hey what size heat-shrink tubing did you get? We live in the middle of nowhere so everything i order will be online.
ReplyDeleteThank you so much for taking the time to post this. I already got the soldering iron purchased yesterday :)
I see that Vitamix is now selling a replacement potentiometer assembly for $24. The wires are already attached with push on connectors on the other end. Maybe they were listening. http://www.amazon.com/s/ref=nb_sb_noss?url=search-alias%3Daps&field-keywords=B00HNQDIYO+
ReplyDeleteThank you so much for sharing your knowledge. After reading your post, I was able to repair our Vitamix in just over an hour.
ReplyDeleteHas anyone ever added a potentiometer to the cheaper 2-speed machines, making it a variable speed one? I suppose you could just install it in the power line....
ReplyDeleteIt's not that simple. The pot acts as a rheostat to govern what is probably a pulse-width-modulation circuit that controls power to the motor. There may also be an op-amp that uses feedback from the motor to adjust output as motor load varies. In other words, you'd need the speed-control circuit board as well. An in-line pot/rheostat would have to be able to dissipate a lot of power, and would probably not fit in the case.
DeleteThank you everyone for the information
ReplyDeleteThank you everyone for the information
ReplyDeleteJust installed on a machine that has jumped to high on start then back to "normal" sped since new. Working great now thanks for the tutorial. One note however, the new pot has a longer post than the oem.
ReplyDeleteThanks for the info....I don't have a soldering iron and I'm too lazy haha
ReplyDeleteFound this one ready to assemble! An extra $10 but no assembly required!
https://www.schedule73parts.us/products/vm15955
Thanks again for all the great info
Joel
The variable control knob on my 5000, purchased in 2004, doesn't have a screw. How do I get it off? Thanks. Dennis in Albuquerque.
ReplyDeleteThanks a lot. It now behaves the way it should. I totally agree with your thoughts on Vita-Mix. Good product but the rest is BS. HO NO! my warranty is now void -ho well:) Thanks again - Art
ReplyDeleteFound it on arrow for $7.24 + free shipping https://www.arrow.com/en/products/53c35k/honeywell
ReplyDeleteHi Alan, thanks for this link! I ordered mine for less than $8 delivered. By far the best deal out there. I could choose between UPS, FEDEX and USPS. I chose USPS since I didn't want to punish the seller for their mistake. Normally you need $50 for free shipping. Can't wait to have my mixer like new. Thanks for OP for great article.
DeleteJust got mine on Amazon but they only had 2 left so if you want one, better hurry.
ReplyDeletehttp://amzn.to/2i7Ug8v
Hello has anyone run across a vitamix with three wires, Red , Yellow and Black wired up to the potentiometer plus a resister between the second and third terminal of the pot?
ReplyDeletethanks
This comment has been removed by the author.
DeleteThe part arrived tonight and I gathered the tools and did the job no problem. I didn't bother with trying to desolder the old wires, rather I cut them off. Quick and satisfying job and the Honeywell part feels like quality. Oh, and my screws were accessible from the top - you have to remove the rubber. Thank you so much for posting this.
ReplyDeleteThanks much for the instructions. Mine was a little different on disassembly (screws on top under rubber boot) but repair was the same. Allied electronics charged $14.00 shipping on a $10.00 parts however much cheaper than anything Vitamix has to offer. Thanks again from a fellow aviator.
ReplyDeleteJust did this successfully - many thanks!! :)
ReplyDeleteHere's the heat shrink tubing I used (I think the units are in feet, because I bought 4 and got much more than I needed!)
"TE CONNECTIVITY
Heat Shrink Tubing ST Polyolefin White Thin Piece" from Arrow Electronics. https://www.arrow.com/en/products/5058694008/te-connectivity
Here's the potentiometer: https://www.arrow.com/en/products/53c35k/honeywell
Currently running a Chinese New Year discount (12% using code ROOSTER17), so with free shipping and 4 feet of heat shrink tubing, the total came out to $9.18! Just had to borrow a soldering station from a neighbor.
I bought a used Vitamix on Ebay "For Parts Not Working" The unit worked on high speed only, no matter the position of the high/variable switch. Thinking it was the potentiometer,I replaced it but to no avail. Later that evening, I recalled back in my photographic days how my pro flash unit arced internally and I lost the ability to isolate or combine the capacitor banks. I replaced the variable/high switch and the unit works like new. Harrison supply sold the part for $14.66 including shipping.#15764. thank you for this site.
ReplyDeleteCan anyone send me the wiring diagram for the vitamix 5000 or tell me where to get it.
ReplyDeleteThank you! My wife is happy its fixed, and I'm happy I saved 137$.
ReplyDeleteThanks for a great instructional video. Just ordered the parts from Allied. Also had to order a knob, part # 70023740, $10.22, since my knob doesn't have a screw. Also the new switch has been replaced with I guess a newer version same specs part # 70153125, $9.06, $5.78 shipping to FL & $1.75 for Obama's vacations. Called Vita-mix just to check if I could buy a replacement knob. Much to my surprise they will not send me a knob but said for me to send in the blender, $150 plus labor?, so they could put the knob on for me. WOW what customer service...what a bunch of shysters. Lesson learned...don't buy vita-products. Again thanks for a very well put together instructional video. Semper Fi...also a fed up former airline pilot...nothing beats military flying!!!
ReplyDeleteB & R Electronics 305-254-4510
ReplyDeleteb&relectronic.com.
My variable speed knob did not work anymore. Thinking that it was the variable resistance switch, I replaced that, but that did not repair it. I figured that the variable speed controller board board was bad($140), but much to my frustration, replacing that still did not repair the variable speed function. Bummer.... I don't think that either of the switches are bad because when the high speed switch is off, 120 volts is still going to the variable speed control board, it is just that nothing is coming out of that board when changing the variable resitance switch. Maybe the replacement board is bad?
ReplyDeleteWow! My wife's 14 year old Vitamix 5000 just quit on her in the middle of a job. She was devastated as we are not in position to buy a new one now and she uses it constantly. Thinking I would take it to an electric repair job assuming the motor had burned out on her, I took the unit, then upon asking her to tell me what it did or sounded like, she told me it just quit suddenly when she turned the knob... no noise, just quit. I knew that wasn't the motor.
ReplyDeleteI AM NOT AN ELECTRICIAN!!! nor particularly mechanically inclined but I can take apart and reassemble almost anything. So, when your post was the first thing I pulled up I couldn't believe my fortune. I read the entire thing then plugged her unit in and switched it to High instead of Variable and it ran fine. Then I put it back on Variable and started turning the knob; sure enough at places it just quits, then at another place it runs fine. (though she said it just quit and wouldn't do anything)
So, thanks ahead of time as I feel completely capable of fixing this thing and am ordering the parts now.
Your blog was the answer to the intermittent nature of the variable speed control on our Vita-Mix 5000. The whole blender is built like an M-60 tank, and they use that measly potentiometer! Took it apart with your fine instructions, waited for the new potentiometer from ebay. 20 minutes after getting it out of the mailbox, I had the leads soldered to the terminals (thanks to your great instructions and pictures, it took longer to warm up the soldering pen that anything else).
ReplyDeleteMay your crew rests be long and restful, and the hotel restaurants have awesome, healthy menus.
This comment has been removed by the author.
ReplyDeleteOk
ReplyDeleteI had no variable speed only high. I replaced the pot and high / Variable switch - still no variable speed. I started looking at the circuit bd. It's a simple circuit for the most part. There is a voltage regulator mounted on that plate behind the circuit card and the circuit bd is mounted to the plate as well. When you remove the assembly (very center screw (one screw) and turn it over your looking at the 3 legs of the regulator in that access hole). But the regulator has 3 legs soldered on the circuit board. One of those legs was no longer soldered. The solder job was so poor (I'm a tech with years of experience) I'm amazed it lasted 10 - 15 years. I soldered the leg back on the circuit board and I now have a working variable speed! I hope this helps. History: this is my Girlfriend's who lives 300 miles away I ordered the most common failure parts (pot / switch)with out having the unit to look at). Once in my hands I was able to dig deeper.
Wires on high / variable switch - looking in from the back with the switch to the right of the pot. 6 lugs.
ReplyDelete- White - Brown
- Blue - Purple
- (none) - Red
My pot had 3 wires with resistor soldered across two legs
-
I ran across your writeup here in searching for an apparentlly common problem with the Vita-Mix.
ReplyDeleteI've been certain that I smoked the PWM controller for some five years now. I was making some chicken salad and using the vitamix to chop the chicken (that sounds funny) This is a task I probably should have used the food processor for in the first place. Ever since then, it's been the symptom of sporadic control of the variable speed.
After reading your article, I figured I'd try to replace the pot rather than send it in for the expensive "One Size Fits All" repair option. This option might be valuable in case of a burned up motor or board but in taking it apart, it would seem the motor is thermally protected somewhat so...
I thought I'd try something prior to ordering and the potentiometer. In the past, I've used products made by Caig called DeOxit and others. They remove buildup and oxidation from pots, sliders and other contacts VERY well. They are a little pricey but they've lasted almost a couple of decades now.
Using the conductive film replenishing product worked perfectly and after a couple of squirts I'm back in business with the Super 5000 plus.
I've used this stuff sucessfully in audio sliders, pots and connectors as well as various other related stuff.
I don't know if this is helpful for everyone but it may be another option jus in case.
I'll try to post a link here.
http://store.caig.com/s.nl/sc.2/category.293/.f
As a little followup. The pot on the VitaMix Super 5000 is a cheap little guy assembled in Mexico. Eh, it lasted more than ten years but as you mentioned, it's nothing as robust as one would expect in a $500 dollar blender.
DeleteIt's plastic with a heat stamped pcb on the back.
I was able to spray the electronic lube into it by spraying in between the pcb and the plastic housing.
Hopefully, the fix will be as long lasting as the results I've had on the 1/3 octave stereo EQ I revived long ago.
Thanks for the writeup, and pictures! Now my vitamix 5000 is back in buisiness
ReplyDeleteYou can add my name to the list of people who are thankful for the fix and extremely disappointed with Vitamix. Ordered the part suggested from Arrow Electronics on Friday Aug. 11 and it arrived on Tuesday Aug 15...and I live in rural Canada. Haven't put it in yet, but the part looks exactly the same as the old switch which, for the moment is working again.
ReplyDeleteThanks for sharing this helpful data with us.
ReplyDeleteI really appreciate it.
Commercial appliances repair in Dubai
I have a problem with my mixer that was gifted to me by a woman that could have been my grandmother so it is very old. I notice when I use it make a frozen smoothie that it gives off a slight hot electrical smell and sounds much louder than it should. Any ideas as to what I should be looking for? Also my middle dial is over turned any help on how to replace this?
ReplyDeleteThanks OP for this info. Just what I needed. The original parts link references a part no longer available. Here is the alternate: https://www.alliedelec.com/honeywell-53c35k/70153125/
ReplyDeletesounds exactly like my 5000. I've ordered the "replacement part" - prices have gone up a bit since 2012 but $16.00 including shipping is still pretty reasonable. Looking forward to the fix, I don't think this is how "variable speed" is supposed to work....
ReplyDeleteHey, got mine fixed! A couple of things were just a little different. My screws are on top under the rubber jar support, so no need to go under and take anything apart. 2nd, my new part did not have a flat spot like my old one did, the new one had a round slotted shaft. If I had a knob with a set screw I'd have been fine. as it was, I just had to file off a bit of one side in the right place and shim it with some tin foil. And now my Vitamix is 100% functional again! Great blog entry, thanks a million.
ReplyDeleteHi Geoff! Would you be so kind as to list the exact item names and links to the parts you used? I have a vitamix 5000 that is have the typical issues detailed above. I ordered the “Vitamix 15955 Potentiometer” from Amazon for almost $30. Do I also need to order a new switch also? Please help! Thanks!
DeleteJust wanted to thank you for posting these instructions... Even six years after you posted them they are still helping people out there fix their Vitamix without paying a ton of money to get it working again! Love finding so many people out there willing to share information that helps us all to keep our hard earned money in our hands!
ReplyDeleteThank You!! Searched for this issue and your post was the first up and I know everything is spot on. Since Allied now wants $13.21 + $17 shipping, I got one off eBay from Mendelsons in Dayton, OH for $10.22 including shipping https://www.ebay.com/itm/163212371915 or just search for RV4NAYSD502A.
ReplyDeleteHey just thank you to the original poster, my vita mix works like new and has for years since this fix...
ReplyDeleteI have a VitaMix Super 5000 blender that was beginning to surge to a higher speed as the knob was rotated. I’m an EE and I know about noisy pots (potentiometers) so I figured I’d replace it. The part that was in there was labeled with: Bourns PCW1J-C24-SL0035. The Bourns datasheet for the part can be found here: https://www.bourns.com/products/potentiometers/industrial-panel-controls/product/PC-Slimline%20Pot and the “PCW1J-C24” portion of the part number describe the mechanical geometry of the part but the “SL0035” suffix, which would normally describe the electrical characteristics of the part, do not match any information in any datasheet I found. An ohmmeter shows this part to have an overall resistance of 4.66k ohms which could mean that it might be a 4.7k part or possibly a 5k part. I tried a 5k (linear) pot and it did work but the sensitivity of the speed control had changed from what the OEM part provided. I re-checked the OEM pot with the ohmmeter again and this time noticed that, with the shaft at the 50% position, I was reading a resistance of 700 ohms which is much less than the 50% of the full-range resistance (0.5 * 4.66k = 2.33k or 2.5k for a 5k pot) that you expect to measure if this were really a “linear taper pot”. In a nutshell, the OEM part is a “CW Logarithmic” or “CW Audio Taper” pot (not reverse or CCW log/audio). This means that the resistance changes more slowly in the earlier stages of rotation and it changes faster the closer you get to the fully-CW point.
ReplyDeleteThis part, PCW1J-C24-CAD502L https://octopart.com/search?q=PCW1J-C24-CAD502L should be a fairly good replacement for the OEM part. It is a 5k part rather than a 4.7k part but that difference will be hard to feel (a 100k ohm fixed 1/2W resistor soldered across the pot would effectively reduce it to a 4.7k ohm part if that were important).
I bought two the PCW1J-C24-CAD502L 5k-ohm audio taper parts from Mouser and I can say that these are, for all practical purposes, an exact match to the OEM part that was in the blender. While these are nominally 5k, parts, their specification only claims to be with +/-20 (or 1k ohms) of that 5k target. In my case, one of the new pots measured 4.58k and the other measures 5.54k. The OEM pot measured 4.65k. You have to keep in mind that the more resistance there is in this speed-control circuit then the faster the blender runs. Given that this blender has a Variable/High selector switch, I don’t think I need more speed out of the potentiometer, so my preference is to opt for a pot with a lower overall resistance to keep the speed more manageable. But just to prove the point and I had access to the a selection of fixed resistors and so that the 5.54k pot didn’t go to waste, I decided to add a shunt resistor between terminals 1 & 3 of the pot (the blender wires go to terminals 1 & 2) to bring the overall resistance down to around 4.6k. The calculation to figure this is as follows. If:
ReplyDeleteRa is the actual resistance of the pot and
Rd is the desired resistance of the pot and
Rs is the unknown resistance of a shunt resistor to bring Ra down to Rd, then
Rs = 1 / ( (1/Rd) - (1/Ra) )
In my case, Ra = 5540, Rd=4600 and that yields Rs=27,100 ohms.
I soldered a 27k, 1/w fixed resistor across the 1 & 3 terminals of the pot and the resistance did indeed then measure 4.6k.
As I said in my prior comment, due to the audio taper used in these pots, the midpoint of the pot only has a resistance of around 700 ohms and that value is so much smaller than the 27k shunt resistor that the shunt resistor really doesn’t have much of an effect at the lower pot settings; it’s only useful for limiting the max speed that can be attained using the pot.
Very nice and detailed specs on the OEM pot and your solution. Thank you.
ReplyDeleteI noticed the POT in my 5000 unit was from mexico. I thought it was odd that a $500 blender would not spec something a little more main stream or "name brand"?
It does seem to be a flaw in many of these. They used to have a flat rate sort of repair policy, I think it was something like $100.
Sad they decided to create an inexpensive weakness perhaps to cover more expensive repairs if that is in fact the case.
These particular Bourn pots are all made in Mexico, I don't know about the entire Bourn product line. Yes, with their all-plastic low-profile construction, these are definitely consumer-grade devices. In Vita-Mixes defense I will say that the choices available for 5K, single-gang, no-integrated-switch, CW-audio taper pots with suitable dimensions and solder-lug terminals is somewhat limited. This $14 one:
ReplyDeletehttps://www.digikey.com/products/en?keywords=KA5021S28-ND
appears to be better quality but you can imagine that a manufacturer would be reluctant to spend that much on a part like this.
That's true. Your solution is pricey as it would be for anyone purchasing quantities of say, less than 10 or 100 units. Economy of scale though for a manufacturer exists but the bean counters at the various companies, be it Vitamix or Cusinart or even Makita or Bosch love to knock off the quality of a product in favor of reduced or cheaper components in favor of minimal increase in profit per unit adding up to bigger bucks in the long run.
ReplyDeleteIt's a shame, it's a short term solution for investors and shareholders.
When you pull apart an older Cuisinart food processor motor base, you see a ten pound motor that almost never failed, excellent switches with the weakest part of the whole thing being the Lexan (bullet-proof) container. :-D The new food processors from them are weak and pathetic by comparison, though cheaper.
The company somewhere decides to go from a commercial quality product line to pro-sumer to Target Store cheapo eventually.
Milwaukee is a good example of this as well in the unrelated tools department.
A supplementary sustain 39 will make you even more enjoy forgive story betting. You can say that this is a minimum bet that puts casino in all the leading leagues in the world. Online Casino betting sites can come up with the money for you in the manner of services. similar to more casino betting, you can invest online and abbreviate the cost of casino betting. Many people may desire to know the price of casino betting. This is only 1 myr. https://918kiss2020.com/tag/039/
ReplyDeleteOnline casinos and online slots mega888 apps on online football betting sites are called our website and are one-stop sites. Or an online website in a "full" format, which will make every customer have a complete one-time deposit. With our customer service system, all our customers will be very http://emilyguajard.simplesite.com comfortable participating in online gambling.
ReplyDeleteThank you for the info!
ReplyDeleteVery Helpful!
The male enhancement subject is within the group of what exactly is 5G Male regarded as a 'controversial' discussion. One of the finest controversies, naturally, is regarding whether or not the products designed for male enhancement work. Regarding this aspect, the medical community appears to stay with the opinion that there are no ways of improving how big a man's sexual organ is.
ReplyDeletehttps://cathreenjohni.wordpress.com/2020/03/05/dont-waste-time-6-facts-until-you-reach-your-maleenhancement/
One no longer has to unblockedgamesbrother sit in a rental store line to check out the games that have been rented out or not. They no longer have to waste Visit My Link money in order to rent a game cartridge for 1 week.
ReplyDeletehttps://sites.google.com/site/unblockedgamesbrother/
Well I just came upon this post as my vitamix has been in the basement for 6 or 7 years. Followed all directions with my new Honeywell dial and I have no variable speed. When I turn it on I have a low and high speed only. Any ideas what is wrong. I know I didn't reverse the wires as I did 1 at a time.
ReplyDeleteAre the two speeds what result from the operation of the Hi/Lo switch or the result of turning the potentiometer (pot or dial" as you call it)? If it is from the switch, then perhaps you have a short between the two wires going to the pot. You must keep in mind for this speed control circuit, low resistance (or zero resistance like that which would result from a short) between the wires or terminals of the pot will cause a low speed. High resistance (like that which would happen if a pot wire was disconnected) causes high speed (I have a suspicion that all the Hi/Lo switch does is disconnect/connect the pot from/to the speed control circuit). If you have access to an ohm meter, you should be able to connect it across the pot wires (blender unplugged) and measure a variable resistance that goes from about zero ohms with the pot fully CCW to about 5000 ohms with the pot fully CW. If the pot works in this manner, then it should be able to vary the speed of the blender if the rest of the speed-control circuit board is working properly.
ReplyDeletewell I don't know much about electric so I thought I followed the instructions exactly. Except the potentiometer that was recommended is no longer available so I bought to one they had to replace it. Looked exactly the same. Anyway I will try to see if the is a short after I get an ohm meter. Maybe you can answer this. With the switch on variable and the pot turned all the way down, is it normal for the motor to engage when turned to the on position?? I haven't used it for so long I cant remember. Thanks Or could this problem have arisen if 1 of the 2 pot wires got knocked off during re-assembly. I don't think that happened but it could have I guess
ReplyDelete.
The pot normally has two wires going to it, right? If either of those wires are disconnected from either the pot or the PC board then I would expect the motor to run at full speed even if the switch was in the variable position. On the other hand, with the two wires shorted together (essentially this is what occurs when the pot is turned fully CCW) then I'd expect that the motor would turn relatively slowly but that it would still run. Mine does and yours should too if your speed control board is still working. If the pot wires got "knocked off" then that means one or both are disconnected and you are looking at a full-speed motor again.
ReplyDeleteRather, continue circumspectly through the house (in obscurity) and nipseyslist consistently get out, "Would someone say someone is there?" (It works stunningly better with a British intonation: "Would anyone say anyone is theah?") At belgiumweb directory the point when you have intercourse, you need to begin outside the house or loft.
ReplyDeleteShirts are maybe the most sold-out thing in the classification of men's shirts. They can be profoundly casual and simple on the body. Recently, T-shirts have gotten a mechanism for communicating one's belief system and enthusiasm for sports. Athlete's pullovers are the most famous case of this class.
ReplyDeletehttps://jovijhurri.hatenablog.com/entry/2020/07/02/192022?_ga=2.121614849.863478122.1593743652-1378732556.1593594672
Some time we never feel equal what we have done but for other that is big achievement. http://www.equalplaces.com/sydney/business-professional-services/dg-sol-agency
ReplyDeleteIn lotto games, you're not looking for a lucky number. You're playing by hoping for a combination of numbers that will come up together in the sequence. If you pick a lucky number and you hit on another one, chances are that you've just won a single game. However, brave|sites if you pick a combination, you can get more than just one win - you can win multiple games if you play your numbers right.
ReplyDeletehttp://luckywinnerlistindia.bravesites.com/
People who win lottery games also seem to be more skilled at guessing, and this has been confirmed by many scientists. This is probably because the lottery games are played with a large number of people, and everyone has the potential to learn a trick or two. But bizbang|boom the trick to learning from past winners is that you have to learn from your own mistakes, not the mistakes of previous players.
ReplyDeletesunshinecoast|services
publicity Strategy is not something that is assistant professor in a classroom or a issue textbook. marketing strategy is actually a comprehensive, long-term, proactive open and a game scheme of any situation or company similar to the ultimate set sights on of reaching a competitive edge by knowing the desires and needs of consumers. promotion Strategy is the art and science of knowing your audience, deal their needs and maximizing <a href="https://dgsoluk.bravesites.com/Web Site</a> the use of welcoming resources to achieve them. It is very nearly the loan of an union amid you and the customer that lead to a win-win business for both of you.
ReplyDeleteAdvertising system is really an exhaustive, long haul, proactive methodology and a blueprint of any business or organization with a definitive target of arriving at a serious edge by knowing the cravings and requirements of shoppers this page....Promoting Strategy is the craftsmanship and study of knowing your crowd, understanding their necessities, and expanding the utilization of accessible assets to contact them. It is about the advancement of comprehension among you and the client that leads to a mutually advantageous arrangement for both of you.
ReplyDeleteNetwork bodes my sources well for health suppliers. Be that as it may, what makes populace wellbeing the board productive? This happens when information is prepared to comprehend the danger official statement variables to show up at educated choices. This situation likewise helps in following all patients by making patient libraries to recommend care rules, to be exact getting sorted out populace into gatherings and subgroups for time bound administrations. The definition is to see how debilitated the populace is, to get uphold from page care supervisor for preventive consideration. Prescient displaying calculations read more here
ReplyDeletehelp in anticipating cases that may have higher wellbeing costs.
A professional painting job the end by a good company can transform your home by enhancing the air learn this here now and spacing of your home and accumulate value to your house. suitably pick the painting company in the same way as care. create positive that you look into several companies and later pick one that meets your needs sufficiently. read this post here
ReplyDeleteThank you for this tutorial and mod. I have replaced my OEM potentiometer before and it lasted barely a year before it started stuttering the motor again. I decided to look up a better, permanent fix when I found this article. PERFECT!
ReplyDeleteThe only difference is that the knob on my Vitamix has a flat side (key notch) on it and it doesn't fit the round shank on the new potentiometer. I took a file to the appropriate side of the Pot. shaft and that fixed that!
Now, I don't ever have to worry about this going bad again.
Why they choose to put such a cheap, flimsy, plastic potentiometer in these most expensive blenders, I have no idea.
Thank you for doing the research for the right parts. Cheers!
Rather than the KU5021S28 part-number pot which has an Slot in the end of the shaft, the part number for the pot with a Flat on one side of the shaft is KU5021F28. They are, however, a bit harder to find, so buying the one with the fully-round shaft and filing a flat on the appropriate side is a reasonable solution.
ReplyDeleteIdeal replacement part @ $5.15 plus $3.50 shipping from www.mouser.com:
ReplyDelete652-PCW1JC24-CAD502L
Manufacturer Bourns, part # PCW1JC24-CAD502L
This is a 5,000 ohm pot with audio (logarithmic) taper. Do NOT get a linear taper pot! 1/4" shaft, w/ flat, 3/4" long.
Hello Anonymous. Thank you for the excellent source for a replacement logarithmic taper potentiometer. I have already replaced the potentiometer on my Vitamix 5000 (VM0103) with the Vitamix replacement version they now sell on Amazon [Vita-Mix 15955 Potentiometer]. I still have no variable speed after replacement. I get high speed only with the high/variable switch in either position. I am therefore hoping that I have a faulty high/variable switch and not a faulty speed control circuit board. Before I order a replacement hi/low switch [found this one on Amazon: Vita-Mix 15764 switch, Hi-Lo], I would like to trouble shoot the wiring to see if the switch is actually bad and needs to be replaced. I am however unable to find any datasheet or wiring schematic for the switch or the speed control circuit. Any alternative source for the switch which might also provide a datasheet with the circuitry would be greatly appreciated. c.garlow@comcast.net.
DeleteGo back and read this old post:
Deletehttps://uppityairlinepilot.blogspot.com/2012/09/vita-mix-5000-variable-speed-fix.html?showComment=1585612706756#c7442949462811910794
At least one of the two wires to the pot MUST connect to its CENTER terminal. If you temporarily short together the two wires to the pot and the Hi/Lo switch is not set to Hi, then the motor should run slow.
Hi Warren,
ReplyDeleteI don’t understand how the guidance in the old post our quote from 2012/09 helps me diagnose the contacts on the Hi/Lo switch. My Hi/Lo switch has five wires connected to five of the six blade contacts on the switch (looking from the back of the switch, on the left is a red, purple, and brown wire, and on the right side is a blank, then a black, and white wire) none of these five wires come from the potentiometer, which has two white wires that connect directly to the speed control board. I am afraid that “temporarily short{ing} together the two {white] wires to the pot” may damage the control board. Am I readying these instructions correctly?? I would just like to test the continuity of the contacts on the Hi/Lo switch, but don’t have a schematic to see which wires are supposed to be open and closed which the paddle is up or down.
If you only have high speed, then that old post describes how that might happen. As for the Hi/Var switch, it is a simple D.P.D.T. toggle switch. Looking at it with the blender base removed and the blender turned upside down on a bench, the switch has three terminals on the right side (toward the center line of the blender) that make up one half of the DPDT switch. The top terminal (in this upside-down state) has no wire connected and I'll call that terminal 1. The next terminal down is terminal 2 of the switch and it has a BLUE wire. The bottom terminal on this side of the switch is terminal 3 and it has a GRAY wire. On the left side of the switch (near the case wall) the top terminal is #4 and it has a RED wire. The right middle terminal is #5 and it has a VIOLET wire. The left bottom terminal is #6 and it has a BROWN wire. Like most toggle switches, an imaginary line that passes down the center of the toggle handle points to the contacts that are closed for that toggle handle position. Terminals 2 & 5 are the COMmon terminals for their respective sides of the switch. Terminals 1,2,3 make up a SPDT switch as do terminals 4,5,6. The two halves of the switch do not interact with each other electrically. In the HI position, terminals 4 & 5 are connected together (0 ohms) as are terminals 1 & 2. Terminals 3 & 6 are both open. In the VAR position, terminals 5 & 6 are connected together as are terminals 2 & 3. Terminals 1 & 4 are open. It's a very simple switch and I doubt that much could go wrong with it, short of spilling your margarita over & into it. But even that can be fixed if the right methods are employed. As for shorting together the pot wires hurting the circuit board, that is what happens anyway when the pot is rotated to its fully CCW (low speed) position if the pot is wired correctly. When the pot's center moving wiper, to which one wire is soldered, is rotated to its CCW end of travel, it is at its zero-ohm position and this occurs because the moving wiper is now in contact with the CCW terminal to which the other wire is soldered.
Delete